Tadelakt Bathroom DIY: How-to Guide & Tips
The smooth, waterproof finish of Tadelakt has adorned Moroccan bath houses and homes for centuries, and now it could be your turn to infuse this luxurious aesthetic into your bathroom or home.
Key Takeaways
- Tadelakt is a waterproof plaster from Morocco, perfect for creating elegant, seamless bathroom surfaces or decorative surfaces.
- Before starting, plan your design and gather all necessary tools and materials, including Tadelakt plaster, a trowel, and a polishing stone.
- Proper surface preparation is crucial; ensure your walls are clean, stable, and primed for the best results.
- Applying Tadelakt is an art—the plaster is applied in layers, then compressed and polished for a smooth, waterproof finish.
- Regular maintenance will keep your Tadelakt bathroom looking fresh and can prevent the need for major repairs.
Discovering Tadelakt: A Traditional Moroccan Plaster
Defining Tadelakt and Its Historical Use
Tadelakt is a lime-based plaster that's been used in Moroccan architecture for centuries. It's known for its durability and waterproof qualities, making it ideal for wet areas like bathrooms. The lime-rich plaster is treated with olive oil soap to create calcium stearate, a chemical reaction that leads to a waterproof yet breathable finish.
The word 'Tadelakt' actually means 'to rub' or 'knead' in Arabic, which hints at the method of application involving polishing with a stone to compact the surface and bring out the beautiful waxy shine.
Recognizing the Benefits for Modern Bathrooms
Why choose Tadelakt for your bathroom? It's not just about the aesthetic appeal—although that's a significant part. Tadelakt is mold-resistant, due to its high lime content, and it creates a seamless surface that is very easy to clean. Sick of dealing with discolouration in the groutlines of tiled bathrooms? Install Tadelakt, and you’ll never look back! Plus, its natural variation in color and texture means each wall is unique, giving your bathroom a custom-designed artisan look.
We offer an affordable and concise online Tadelakt class that shows how to make the plaster from cheap, readily-available materials and gets you plastering in no time. For a how-to explanation of the process, read on.
Planning Your Tadelakt Bathroom Project
Assessing the Scope and Design Options
First things first, let's talk about what you want to achieve. Are you looking to Tadelakt an entire bathroom or just a feature wall? Consider the color and texture you desire. Tadelakt comes in various hues, and while it's traditionally found in earthy tones, you can tint it to suit your taste. Think about how the final product will complement your fixtures and fittings.
Gathering the Necessary Supplies and Tools
Before diving into your project, make sure you have everything you need. Here's a quick list:
- Tadelakt plaster (you can make this yourself from simple ingredients or buy a ready-made product)
- A hawk or plasterer's board
- A fine trowel for application
- A special polishing stone for compressing the plaster (it needs to be really smooth, have one flat side and a hardness of MOH7+ - Agate, Jasper, etc.)
- Natural (olive oil) soap for the waterproof finish
- Rubber gloves and a sponge
- A primer suited for lime plaster (this will depend on the surface you are plastering)
Preparation: Laying the Groundwork for Tadelakt
Surface Prep: Getting Your Walls Ready
If you are working in a wet area such as a shower, make sure that you comply with the building regulations by using appropriate types of plasterboard and by having your water-proofing (tanking) installed before you start plastering.
Tadelakt has to be applied over a stable, porous, clean surface. Your walls should be free of dust, dirt, and loose paint. This is why it is likely that you have to apply a primer and/or key coat to form a porous surface that is compatible with the Tadelakt.
Priming & Base Coat Application
Before the Tadelakt can be applied, a solid foundation is essential. We recommend applying a lime base coat over a thin textured coat of tile adhesive. This base coat is crucial as it will give the top coat something to adhere to and help in achieving that smooth, even finish Tadelakt is famous for.
Once that base is in place the Tadelakt plaster is applied in several very thin coats.
Buying Tadelakt or making it from scratch
Applying Tadelakt is a labor of love, requiring patience and attention to detail. You'll start by mixing the Tadelakt plaster. You can either buy a ready-made Tadelakt and mix it according to the manufacturer's instructions, or you can make up your own from these simple ingredients.
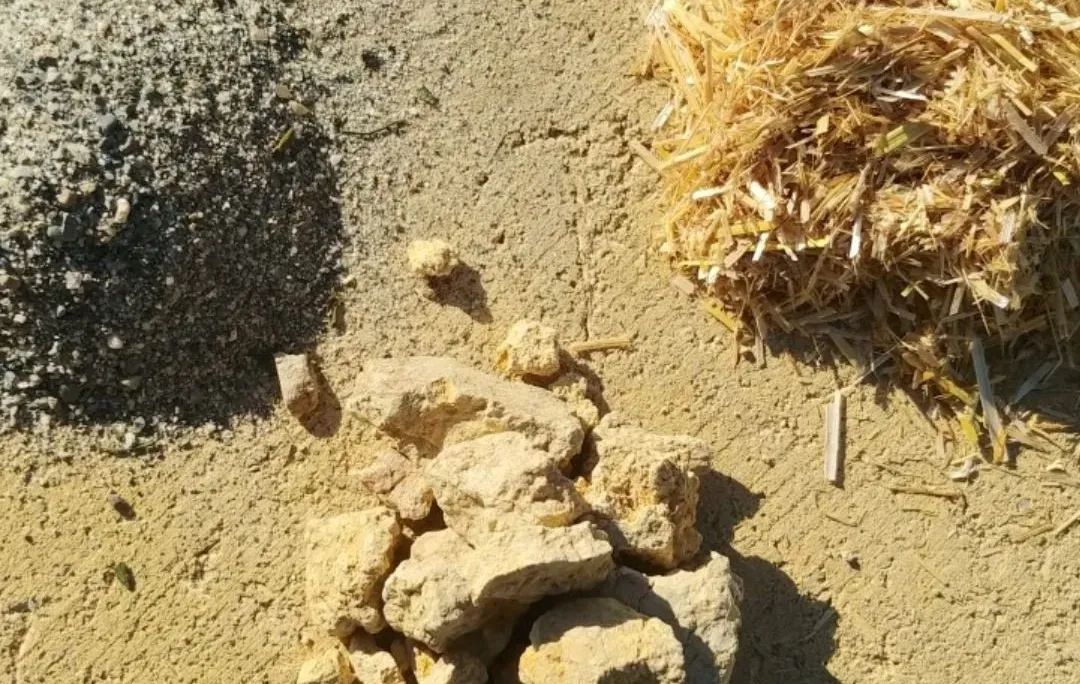
DYI Tadelakt Recipe (cheap as!)
1 part lime putty (made from Hydrated Lime and water)
1-1.25 parts very fine lime or marble sand (this is often sold as Agricultural Lime fertilizer, you might have to put it through a kitchen sieve as you want it to be 0-2mm)
Optional lime-fast pigments
It's important to get the consistency right—too thick and it won't spread easily, too thin and it won't build up properly. Adding color to your Tadelakt is also an option. You can mix in natural pigments to the plaster before application to achieve a wide range of hues that complement your bathroom's design.
We recommend you do a Tadelakt sample as a test first, to get the hang of it.
Step-by-step Guide to the Tadelakt Application
Working in Layers: Applying and Compacting the Tadelakt
Once your plaster is ready and your base coat is set, it's time to start the Tadelakt application. You'll apply the plaster in several thin layers, using a sponge trowel for initial coats and a flexible steel or plastic trowel for the last coat. Spread the Tadelakt evenly and thinly across the surface. Work in small sections to keep the plaster manageable.
After the first layer is applied, allow it to set slightly before compressing it with a plastic trowel or float and applying the next coat. This helps to compact the plaster and start building the smooth surface you're looking for. Getting the timing right is crucial, and is something that has to be practiced to understand in a tactile way.
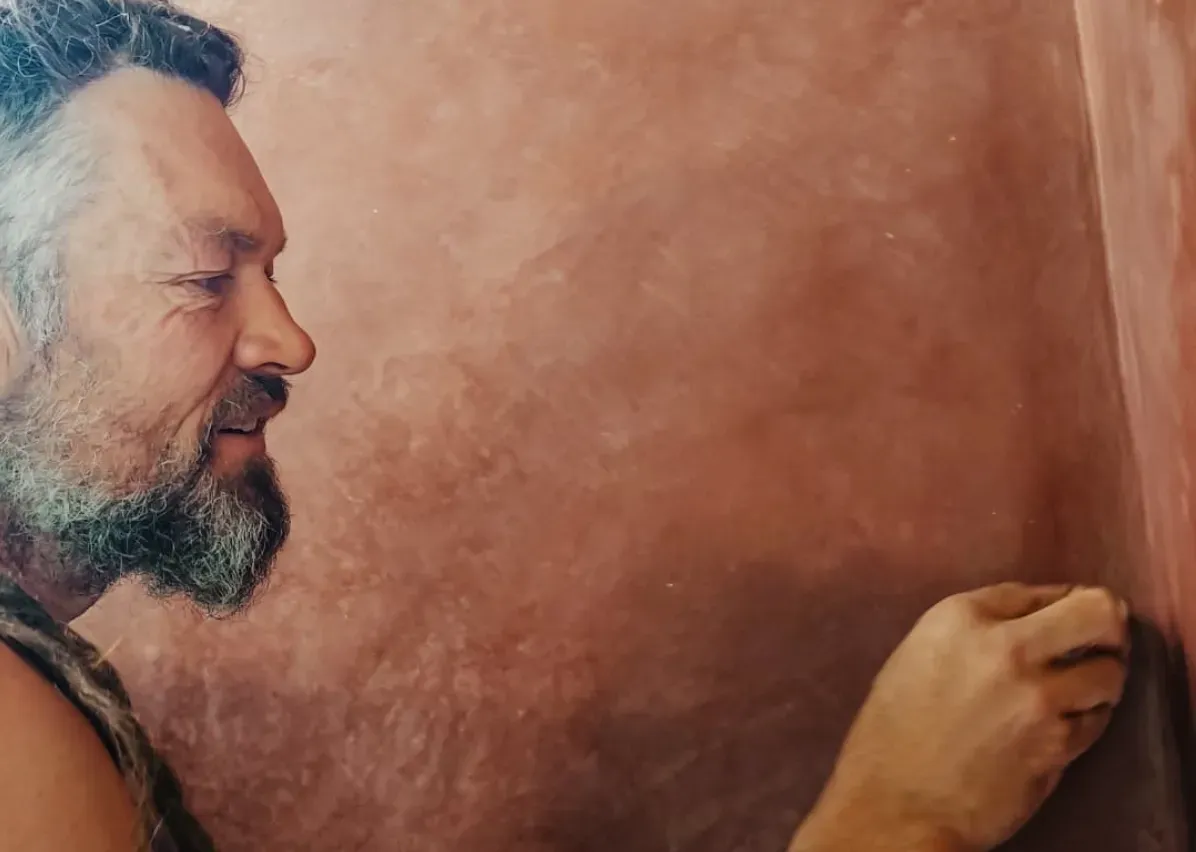
When the plaster is dry to the touch but still a bit soft, it's time for the magic to happen. You'll take your polishing stone and begin to gently rub the plaster in a circular motion. This process, called 'burnishing,' compresses the plaster further and starts to bring out its natural sheen as the plaster firms up and cures while being worked.
Finishing Touches: Sealing and Polishing Tadelakt
The final step in the Tadelakt process is sealing and polishing the plaster. This is done using a natural soap solution, which reacts with the lime in the plaster to create a waterproof surface. Apply the soap generously with a sponge or soft brush, then polish it in with your stone. This not only seals the plaster but also enhances its waterproof qualities and gives it that characteristic silky sheen.
The Tadelakt Process at a Glance
- Test Absorption of substrate
- Lightly mist the wall with water
- Apply first coat of Tadelakt with sponge(float) in big strokes
- Clean tools and wait for the first coat to dry a bit
- Apply second coat of Tadelakt with sponge(float)
- Clean tools and wait for the second coat to dry a bit
- When it starts to have little cracks, apply smoothing coat with a flexible steel or plastic trowel
- Continue smoothing, spreading and re-spreading, filling little holes with the creamy stuff. Go for it. Keep the big picture in mind but do all the details too.
- When it goes a bit dry and motley, start stoning very gently and keep stoning until you hear a slight scratchy noise. Feel around with your hand and do the drier spots first. Stop stoning when you hear the scratchy noise, otherwise you will damage the surface.
- Apply olive oil soap and carry on stoning until it gets shiny. Apply a couple of coats of soap. Polish with stone.
- Apply more soap for several days (without stoning) but make sure to wipe off any residue sitting on the surface.
- Let the Tadelakt cure for 4-6 weeks. You can apply wax after that (optional)
Note: Some practitioners work with less, some with more coats. We found three thin coats to work well. If you need more working time, apply an extra coat before compacting and stoning.
Caring for Tadelakt Surfaces
Protective Measures for Longevity
To ensure your Tadelakt bathroom stands the test of time, it's important to take some protective measures. Avoid using harsh chemicals or abrasive tools when cleaning, as these can damage the finish. Instead, opt for natural pH-neutral soap and soft cloths. Regularly reapplying the soap finish can also help to maintain the waterproof barrier and keep the plaster looking its best. Some people also like applying a coat of Carnauba wax polish for extra sheen and protection.
Maintenance: Keeping Your Tadelakt Looking New
Like any bathroom surface, Tadelakt requires maintenance to keep it looking fresh. Wipe down the walls after use, and avoid using anything acidic (like apple cider vinegar, lemon juice or bleach) in your shower. If you notice any areas that begin to dull or lose their waterproofing, a simple reapplication of the soap finish and a gentle polish with the stone can restore the surface. It can also be beneficial to apply a Carnauba wax polish from time to time.
Common Challenges and Solutions in Tadelakt Installation
Dealing with Cracks and Imperfections
Cracks and imperfections can occur in any plaster wall, and Tadelakt is no exception. It is advisable to do a practice sample before attempting a bigger surface. That way you can fine-tune the ratios of sand to lime putty. If you get cracking, ever so slightly increasing the sand content might solve the problem. If you find a crack later, you can repair it by reapplying a small amount of plaster to the area, sponging it in and then treating it with soap once it has set.
Preventing and Managing Water Damage
While Tadelakt is waterproof, it's still essential to manage water exposure properly. Ensure that your bathroom is well-ventilated to prevent moisture build-up. If you notice any areas where water pools or doesn't drain properly, address these issues promptly to avoid water damage. It is important that waterproofing (tanking) is installed as a first layer over plaster board, before you start applying the base coat of lime plaster. Make sure the detailing around fixtures is done properly and with care.
Additional Design Ideas for Your Tadelakt Bathroom
Incorporating Fixtures and Accessories
When it comes to fixtures and accessories, the simplicity of Tadelakt allows them to shine. Choose hardware that complements the color and finish of your Tadelakt for a cohesive look. Consider brass for a warm, luxurious feel or matte black for a modern edge.
Combining Tadelakt with Other Materials
Tadelakt pairs beautifully with a variety of materials. Consider combining it with natural wood for a warm, organic feel or with stone tiles for a touch of rustic elegance. The key is to balance textures and colors for a harmonious bathroom design.
FAQs
Can Tadelakt be applied over existing tiles?
While Tadelakt is traditionally applied over a suitable substrate prepared for lime plaster, it is possible to apply it over existing tile with the correct preparation and products. However, this is a complex process that might be best left to professionals, as the tiles must be thoroughly sanded and primed to ensure proper adhesion.
How long does Tadelakt last in a bathroom environment?
When applied correctly and maintained with care, Tadelakt can last for decades. Its lime-based composition naturally resists mold and mildew, making it ideal for the humid bathroom environment. Periodic reapplication of the soap finish can extend its lifespan even further.
Does Tadelakt require special care or cleaning products?
Yes, Tadelakt should be cleaned with gentle, pH-neutral cleaning products. Harsh chemicals or abrasive scrubbers can damage the surface and compromise its waterproof properties. For daily maintenance, a simple wipe-down with a soft cloth and mild soap is sufficient.
What are the color options available for Tadelakt?
Tadelakt can be tinted with natural or synthetic pigments, offering a wide range of color options. You can choose from soft, earthy tones that reflect its Moroccan roots, or vibrant hues to match a more contemporary palette. Always mix pigments thoroughly to ensure an even color throughout.
Is Tadelakt suitable in Kitchens?
Tadelakt can be applied to any suitable surface, and can look stunning in kitchens and other rooms. The main concern when using it for example for kitchen tops is that it should never come in contact with anything acidic, because that would damage the lime surface and stain it. Food stuffs like lemons, tomatoes and vinegar would have to be kept well away from the Tadelakt surface.
Is Tadelakt suitable for a DIY beginner?
Tadelakt application is an intricate process that requires patience and precision. It can be a challenging project for a DIY beginner, but it is absolutely possible to do it with a bit of guidance. Start with a small project to hone your skills before tackling a full bathroom.
We offer a concise and affordable online Tadelakt course that covers everything you need to know in both theory and practical demonstrations.
We also regularly run skill-building sessions live online or at in-person workshops, where we do a Tadelakt practice piece together. We are happy to coach you through the process and encourage you to have a go!